

Introduction
This tool empowers developers to enable CI/CD (Continuous Integration/Continuous Deployment) of portal configuration. You can use this tool to check-in the portal configuration to source control and move portal configuration to any environment using Power Apps CLI.
For more details about Power Apps CLI support for Power Apps Portal. You can check these articles:
- https://docs.microsoft.com/en-us/powerapps/maker/portals/power-apps-cli-tutorial
- https://docs.microsoft.com/en-us/powerapps/maker/portals/power-apps-cli
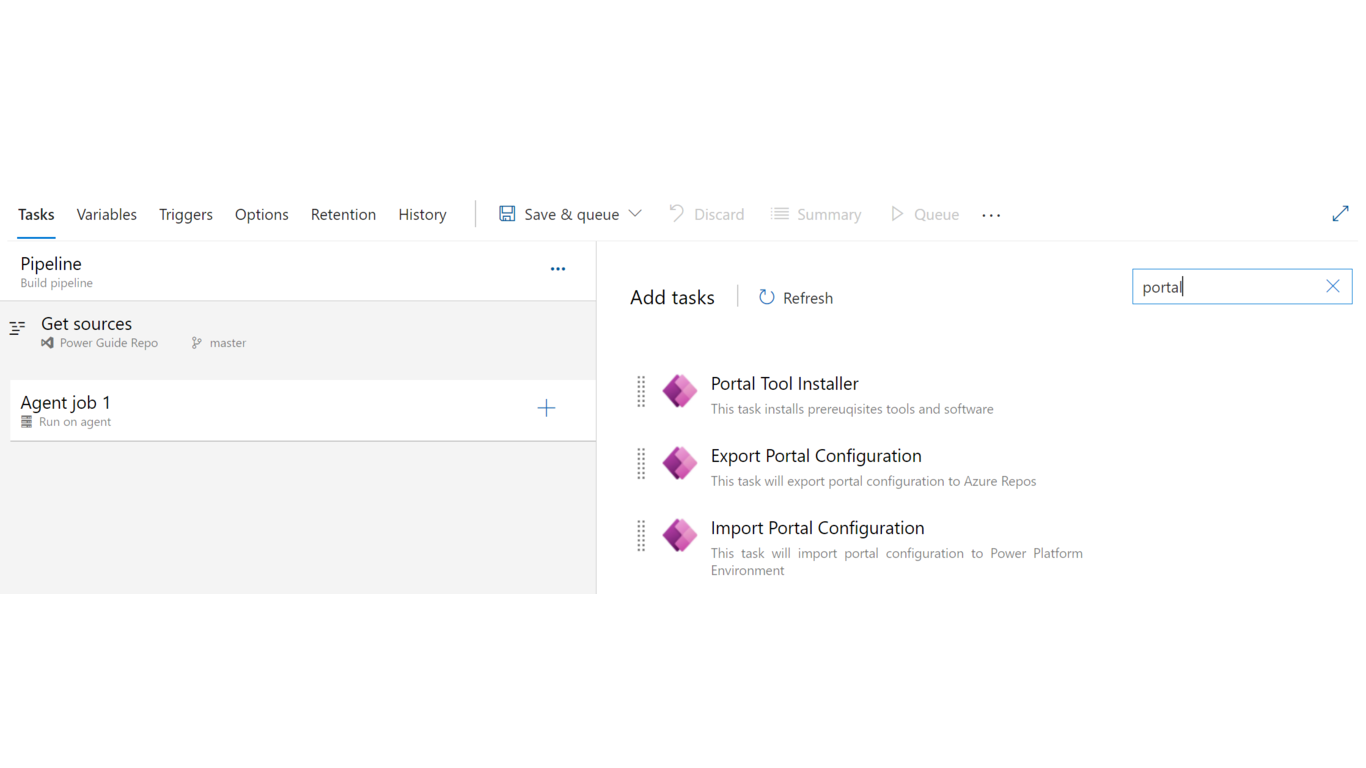
| Task | Description |
|---|---|
| Portal Tool Installer | This tasks install pre-requisites tools like node.js and npm to connect, authenticate, download and upload the portal configuration |
| Export Portal Configuration | This task exports the portal configuration from power platform enviornment and save it in the source control. |
| Import Portal Configuration | This task imports the Portal configuration in power platform environment |
Pre-requisites
- Setup Azure DevOps account.
- Create Project in Azure DevOps.
- Create Repository and Folder Structure (to store portal configurations).
- Install PowerApps Portals Build Tools
- Register Azure AD App and create Application User in D365 environment
- Assign Permissions to manage repository.
Search for Project Collection Build Service. Choose the identity Project Collection Build Service ({your organization}) (not the group Project Collection Build Service Accounts ({your organization})). By default, this identity can read from the repo but cannot push any changes back to it. Grant permissions needed for the Git commands you want to run. Typically you’ll want to grant:
- Create branch: Allow
- Contribute: Allow
- Read: Allow
- Create tag: Allow

Steps to configure
Step 1 – Install the extension in your Azure DevOps Instance
- Create a build pipeline in Azure DevOps and find the tool with the name : “Power Apps Portals Build Tools”.
- Click on “Get it free” to get this tool installed in your Azure DevOps instance.


Step 2 – Portal Tool Installer
Portal Tool Installer task is used to install all prereusites softwares and tools like npm, node.js etc in Azure Devops VM. These tools and softwares are required to connect, authenticate, download and upload the portal data from/to your Power Platform environment.

Step 3 – Export Portal Configuration
Export Portal Configuration task is used to export(download) the portal configuration (form, list, webpages, content snippet etc) from your Power Platform environment and store it in the source control. In order to use this task in your build pipeline(CI), You need to pass some mandatory information like D365 instance URL, application Id, client secret, tenent id, website id and the folder path of your source control where you want to save the portal configurations.
Here are the mandatory details that you need to provide:
- Dynamics 365 URL: https://.crm.dynamics.com
- Application Id: Register an Azure AD app in azure and capture this value from there
- Client Secret Key: Register an Azure AD app in azure and capture this value from there
- Azure Tenant Id: Capture this value from your Azure AD
- Portal Website id: Capture this value from Dynamics 365 instance, where your portals is installed
- Save export data (All): Folder path in repository, where you want to store your complete portal configuration data. For Ex. if you have a folder in repository with name Power-Platform-Solution and inside that there is one more folder called PowerApps-Portals, where you want to export the portal configuration, then this parameter value must be: Power-Platform-Solution\PowerApps-Portals
- Save export data (Selected): Folder path in repository, where you want to store only selected portal configuration data.
- Exclude data: Here you can provide the list of all tables/files (in comma seperated format) whose data you don’t want to import in target instance. For example, while doing Portal deployment if you don’t want to migrate site-setting, content-snippet and website-language data to target instance, then you can specify these file/table folder name in comma seperated format. Please see below screenshot to check the folder/file name of portal components.
Important Note: I have used Output variable in order to pass the Exclude data value to the next step of the pipeline. Hence, set the reference name (portal) of the output variable as per the shown in the following screenshot.


Note: For security reasons, you should use Pipeline variables to store the confidential details like Application Id, client secret etc.


Step 4 – Commit data to source control
Once you export the portal configuration, it is currently available on your Azure DevOps virtual machine. You need to commit that data to your source control in Master branch. To do that, you should add a Powershell task and add the following script.
git config --global user.email "arpit@bizappmvp.onmicrosoft.com"
git config --global user.name "Arpit Shrivastava"
git config --global core.longpaths true
git checkout master
git add Portal-Components
git add Portal-Components\Portal-Configuration\Starter-Portal
git add Portal-Components\Portal-Deployment\Starter-Portal
git commit -a -m "changes"
git push origin master
Understand the script and folder path
Line 1-2 Commands: Enable PowerShell scripts to run Git commands. You need to provide build user’s account details, who have the appropriate permissions to perform operations in GIT repo. Check this article for more details.
Line 3 Command: It’s optional. You need to add this command in the script if you have a nested folder structure in your GIT repo. Git has a limit of 4096 characters for a filename. If you maintain 3-4 deep level of subfolder’s nesting to store the portal configuration, then add this line in the script to avoid getting error: “Unable to index file – Adding files failed in the folder due to filename too long”.
Line 4 Command: is used to Checkout your branch. In my case the branch name is ‘master. Therefore, I am checking out ‘master’. Please replace it with your branch name.
Line 5-7 Command: If your GIT repo has following folder structure. Then in line 5, you need to mention ‘Portal-Solution’ (Root folder of Portal) and in line 6 and 7 you should mention ‘Portal-Solution\Portal-Configuration’ and ‘Portal-Solution\Portal-Deployment’ respectively.
-Repo
-Portal-Solution (Root Folder 1)
–Portal-Configuration
–Portal-Deployment
-D365-Solution (Root Folder 2)
And if the folder structure is like below, then in line 5, you need to mention ‘Portal-Solution’ (Root folder of Portal) and in line 6 and 7 you should mention ‘Portal-Solution\Portal-Configuration\Starter-Portal’ and ‘Portal-Solution\Portal-Deployment\Starter-Portal’ respectively. (if you are deploying starter-portal)
-Repo
-Portal-Solution (Root Folder 1)
–Portal-Configuration
—Starter-Portal
—Customer-Portal
—Partner-Portal
–Portal-Deployment
—Starter-Portal
—Customer-Portal
—Partner-Portal
-D365-Solution (Root Folder 2)
Line 8 Command: Commit the changes to the repository
Line 9 Command: is used for pushing the local repo changes to Git repo.


Note: You only replace the highlighted part in the script. And use the folder path as per the instructions provided.
Step 5 – PowerShell Script to exclude data from being exported
This script has a logic to remove the portal component folders from the repository that you don’t want to migrate to the target instance. To manage this, i have created 2 folders (Portal-Source and Portal-Deployment) in my repository. Portal-Source folder holds the complete portal data export and Portal-Deployment folder holds only selected portal data export (that i want to import).
Currently, there is no way in PowerApps CLI to do the increamental or selective portal component deployment. The only alternative, i found is to remove the corresponding folder of a particular portal component.
git config --global user.email "arpit@bizappmvp.onmicrosoft.com"
git config --global user.name "Arpit Shrivastava"
$tables = $(portal.ExcludedTables);
$lists = $tables.split(",");
Write-Output $lists
foreach($l in $lists) {
git rm -r Portal-Components\Portal-Deployment\Starter-Portal\<name of your portal website>$l Write-Output $l removed...
}
git add .
git commit -a -m "removed folder"
git push origin master
Note: In the above Git Commands,
1. Replace “arpit.crmconsultant@gmail.com” and “Arpit Shrivastava” with your Azure DevOps account details in above PowerShell script.
2. Replace Portal-Components\Portal-Deployment\Starter-Portal\arpitpowerguide—arpitpowerguide with your repository path, where you want to keep the portal configuration that will be migrated to target environment.


Step 6 – Publish Artifact
This step is used to store the build artifacts to the staging directory.
Please point ‘Path to publish’ field value to the folder, where you are storing the selective portal data export in the repository.

Step 7 – Create Deployment Profile
Please read the following articles to know what is the significance of using deployment prifiles and how to use it:
- https://powerapps.microsoft.com/en-us/blog/power-apps-portals-create-deployment-profile-for-dev-test-prod-environment-using-power-apps-cli/
- https://docs.microsoft.com/en-us/powerapps/maker/portals/power-apps-cli-tutorial#step-5-upload-the-changes
You need to manually create the deployment profiles inside the folder containing the portal content (see below). In the below example, I have to deploy the portal to SIT, UAT and PROD environment. Therefore, I have created 3 different deployment profiles.

Note: Creating Deployment Profiles is an one time activity. From next time onwards, you may only required to change its content (if required).
Step 8 – Import Portal Configuration (Use it in Release Pipeline)
Import Portal Configuration task is used to import(upload) the portal configuration (form, list, webpages, content snippet etc) to your Power Platform environment. In order to use this task in your release(CD) pipeline, You need to pass some mandatory information like D365 instance URL, application Id, client secret, tenent id and the folder path of your source control where you have exported/stored the portal configurations.
Here are the mandatory details that you need to provide:
- Dynamics 365 URL: https://.crm.dynamics.com
- Application Id: Register an Azure AD app in azure and capture this value from there
- Client Secret Key: Register an Azure AD app in azure and capture this value from there
- Azure Tenant Id: Capture this value from your Azure AD
- Portal data: Point this to your build artifact (as shown below)
- Deployment Profile Name: Provide the nsme of deployment profile thst you hsve created for your target environment. Let say, if your UAT deployment profile is UAT.deployment.yml then the name of deployment profile would be UAT.


Step 9 – Update Website Binding (Only one time)
Earlier portals (of the same type) website ids used to be the same. However, as per recent updates now you can have multiple portals installed in your Dataverse environment. Therefore, portal website ids can not be the same. That means, the ‘Starter Portal’ installed in the Development environment will have the different website id from the Starter Portal installed on UAT environment. So now, you need to perform the following steps once you succesfully deployed the portal configuration to the target environment (SIT, UAT, PROD, etc):
- Delete the existing Website record from the target environment that got created after portal installation. Let say, you are deploying Starter Portal from your Development environment to UAT environment. Then after migrating the portal configuration, you will see two website records. One, that got created after portal installation and the another one is just created after portal deployment.
- Navigate to Power Apps Portal Admin Center
- Under Portal Details, Update Portal Binding by choosing newly deployed website.
- Wait for few seconds, your portal will be up and running.
Note: This is an only one-time activity that needs to be performed on each target environment after portal deployment. From next time onwards, the subsequent deployment will update the portal configuration in the target environment.
Step 10 – Confirm the deployed changes
To confirm the changes deployed to the target environment, Clear the server-side cache, or use Sync Configuration by using Power Apps portals Studio.


One thought on “PowerApps Portals Build Tools – Automate Portal Deployment”